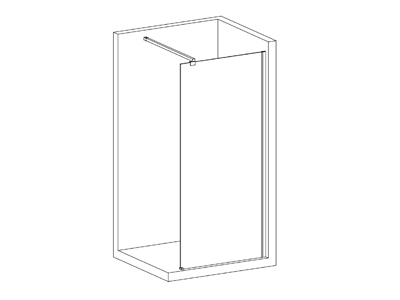
Bath Screen Chrome Frame - 900 x 1450mm

Bath Screen Chrome Frame - 900 x 1450mm

This Bath Screen Glass is ideal if you do not wish to use a shower curtain on your bath tub.
The bath screen is fixed to the wall on one end and stops all splashes from the shower head helping keep your bathroom floor dry.
Features
- Height: 1450mm.
- Width: 900mm.
- Length: N/A.
- 6mm Tempered Glass.
- Shiny Chrome Frame.
- Versatile range accommodates a wide range of bathtub shapes.
- Includes fixings for solid walls only.
Product Specifications
| Type | Shower Screens |
|---|---|
| Colour | Chrome |
| Glass Thickness | 6 mm |
| Height (mm) | 1450 mm |
| Brand | CTM |
| Length (mm) | 900 mm |
| Product Weight | 50 kg |


Ready when you are!
Buy Online and we will reserve and pack your order to ensure a speedy collection at your local CTM store. We offer free collections at all our CTM stores countrywide.
Normally, orders will be ready for collection on the same day payment is made and confirmed. For all cheque payments, your order will be processed and dispatched once the cheque is deposited and clears. See all our payment options here.
Tools you’ll need:
- Rubber hammer.
- Electric drill.
- Hack saw.
- Sealant gun.
- Spirit level.
- Standard screwdrivers.
- Tape measure.

Check you have the following:
- Glass panel
- Support Arms
- Frame (also known as channels)
- Silicone strip
- Fixing screws and plugs
- Silicone sealant
Step 1. Unpack Your New Shower Screen
- Open the box and place each component separately on the bathroom floor.
- Turn off your water at the mains before attempting the installation.
- Make sure you have had the flooring tray or tiles installed before installing the Shower Screen.
- Before installation check that the shower area is dry and no moisture/water is present on the walls.
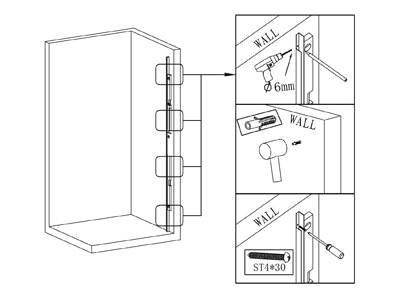
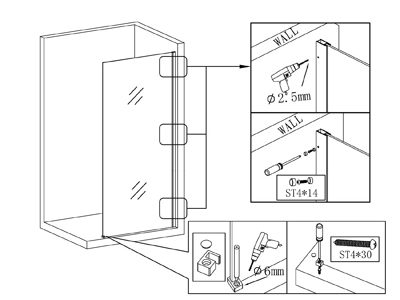
Step 2. Level, Mark and Fix Shower Screen u-Channel
- The vertical upright u-channel is used to hold the shower screen firmly in place over the shower area. They are fixed to the wall using screws and then the screen frame is in turn screwed to each bracket.
- Use a spirit level to make sure the shower screen u-channel is level.
- Mark the holes you wish to drill on the wall with a pencil through the holes in the u-channel.
- Drill the holes carefully keeping the drill perpendicular to the tile.
- Add a line of silicone at the back of the shower screen u-channel before fixing it to the wall.
- Once the holes have been drilled, add plugs inside the holes and secure the u-channel to the wall.
Tip : Place a masking tape over the marked hole to prevent the drill bit from slipping.

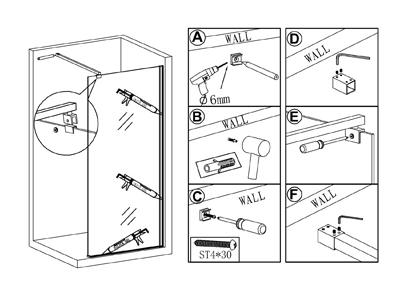
Step 3. Assemble Shower Screen Glass
- Fit the rubber silicone seal to the bottom of the glass screen.
- Caution : Take care of the edges of the glass panel as these are the most sensitive area of the shower screen.
- Fit the shower screen into the u-channel. Position the screen so that it sits on the floor or bath.
- Get someone to help you hold the screen in place while you drill pilot holes into the screen frame using the guide holes on the u-channel.
- Secure the screen in place with screws provided.
Step 4. – Install Elbow Support Arm
- Add the screw caps to the uchannel screws.
- Install the shower screen arm to the wall and to the top of the shower screen.
- Make sure the elbow arm is not in the way of the shower head.
- Once the elbow arm is installed make sure the screen is sitted firmly and does not wobble.
Step 5. – Quality Check and Adjustments.
Tip : Add silicone to all the areas where the fixed panels touch the floor and the walls on the OUTSIDE of the shower screen to create a water proof seal.
- Wait for the silicone to dry for 24 hours before using your new shower screen.